After installing about 15 applications my phone displayed notifications informing me memory was low. I needed a solution because I wanted to install other applications. I discovered a ROM that had A2SD installed, but the biggest problem was figuring out how to set up A2SD. I spent hours researching how to properly install and verify A2SD was working.
Requirements:
- The current ROM must have A2SD support
- Must be rooted (I used Unrevoked)
- SD card must be formatted properly (my settings are 0 swap, 512mb ext, and the rest regular FAT for everything else)
Step One:
Download ConnectBot from the market. Use Barcode Scanner for QR code below or search for ConnectBot in the market.

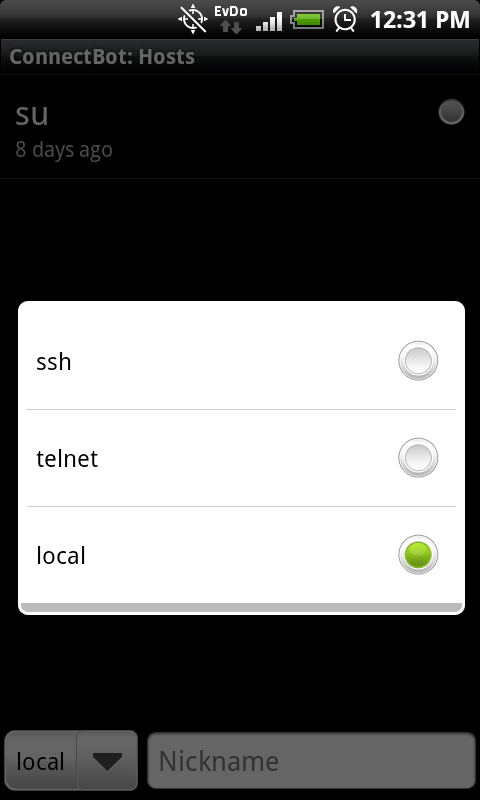
Step Two:
Open Connect bot. Click on down arrow next to ssh. Tap local.

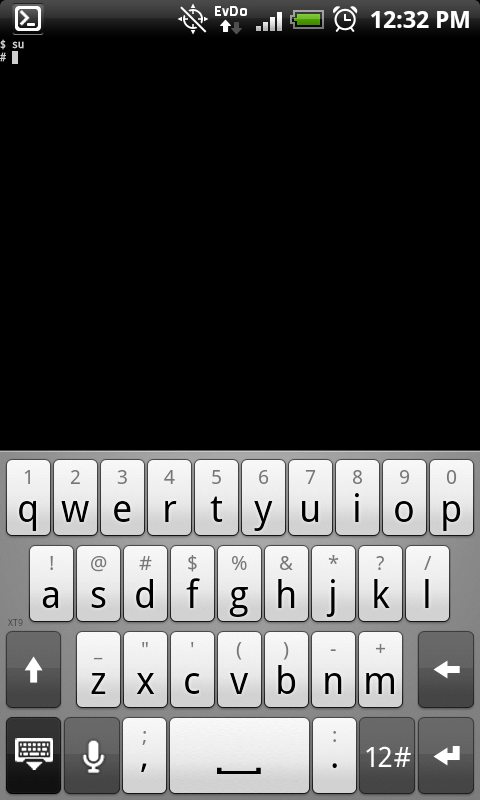
Step 3:
Type in a nickname, I used su. Hit Enter.
An almost completely black screen should show with a dollar sign at the top left. Type in “su” (without quotes) and hit enter.

After tapping enter.

Step 4:
After tapping enter you may be prompted to allow Super User permission from phone. Tap Allow.
The major difference between the two screen shots above are “$” and “#”. The “#” sign signifies we have root privileges.
Next type “a2sd check” and tap enter.
NOTE: If your phone doesn’t have a hardware keyboard you may notice while trying type “2” you also type “w”. In order to type “2” without a “w” simply change to the numerical keyboard layout.

Your screen should look similar to the above screen capture.
Step 5:
If your phone doesn’t have a check mark next to “Programs run from SD card” then type “a2sd install”, follow prompts to install.
Step 6:
Same for Dalvik Cache (only if you want the cache on SD card, it saves memory on phone). To install Dalvik Cache on phone type “a2sd cachesd”, Follow prompts to install.
Verify:
To verify everything is setup correctly after simply type “a2sd check”. You should now have check marks next to “Programs run from SD card” and “Dalvik runs from SD card”
Questions? Leave a comment below.

After installing about 15 applications my phone displayed notifications informing me memory was low. I needed a solution because I wanted to install other applications. I discovered a ROM that had A2SD installed, but the biggest problem was figuring out how to set up A2SD. I spent hours researching how to properly install and verify A2SD was working.
Requirements:
- The current ROM must have A2SD support
- Must be rooted (I used Unrevoked)
- SD card must be formatted properly (my settings are 0 swap, 512mb ext, and the rest regular FAT for everything else)
Step One:
Download ConnectBot from the market. Use Barcode Scanner for QR code below or search for ConnectBot in the market.

Step Two:
Open Connect bot. Click on down arrow next to ssh. Tap local.
Step 3:
Type a nickname, I used su. Hit Enter.
An almost completely black screen should show with a dollar sign at the top left. Type in “su” (without quotes) and hit enter.

After hitting enter.
Step 4:
After hitting enter you may be prompted with a Super User permission from the phone. Tap Allow.
The major difference between the two screen shots above are “$” and “#”. The “#” sign signifies we have root privileges.
Next type “a2sd check” and tap enter.
NOTE: If your phone doesn’t have a hardware keyboard you may notice while trying type “2” you also type “w”. In order to type “2” without a “w” simply change to the numerical keyboard layout.

Your screen should look similar to the above screen capture.
Step 5:
If your phone doesn’t have a check mark next to “Programs run from SD card” then type “a2sd install”, follow prompts to install.
Step 6:
Same for Dalvik Cache (only if you want the cache on SD card, it saves memory on phone). To install Dalvik Cache on phone type “a2sd cachesd”, Follow prompts to install.
Verify:
To verify everything is setup correctly after simply type “a2sd check”. You should now have check marks next to “Programs run from SD card” and “Dalvik runs from SD card”
Questions? Leave a comment below.